How to Use LUTs in Premiere Pro: A Complete Guide
Look-up tables (or "LUTs") are one of those tools that seem intimidating until you use them. LUTs are essentially pre-defined color transforms that you place on a clip to either normalize flat log footage or create a creative look. Once you know the difference between the two LUT slots in Premiere Pro, using LUTs becomes muscle memory. If you're serious enough about color grading to buy a good color grading monitor, you'll avoid the frustration of trying to judge colors on a laptop screen.
This tutorial explains where LUTs reside in the Lumetri Color panel, how to import your own LUTs, adjusting the strength of the LUTs, troubleshooting strange color shifts others have mentioned on Reddit, and where to find gear related to color grading.
What a LUT Does
A LUT is simply a mathematical table. It takes each of the three RGB values entering the table and creates a new set of RGB values exiting. That's it. No magic. No AI. Just mathematical lookups. A camera-matching LUT changes your log footage (Sony S-Log3, Canon C-Log, Arri LogC, etc.) to Rec. 709 so it displays correctly on a standard display. A creative LUT adds another level of stylization, adding a teal and orange cinematic feel or a cold desaturated feel people commonly associate with thriller films.
In Premiere Pro, the camera-matching LUT sits in the Input LUT slot and the creative LUT sits in the Creative Look slot. The Input LUT lives in the Basic Corrections area and is used to technically convert log footage to Rec. 709. The Creative Look resides in the Creative area and is for stylistic applications.
This separation is important because the Input LUT must run before any other color grading adjustments (like exposure, contrast and white balance). Without normalizing your footage first, applying a creative LUT over log footage causes the creative effects to distort and muddle. Many new editors make this mistake and then complain about the LUT.
You can also pick up useful gear adjacent to grading workflows, like reference monitors at B&H or calibration tools.
Using a Built-in LUT
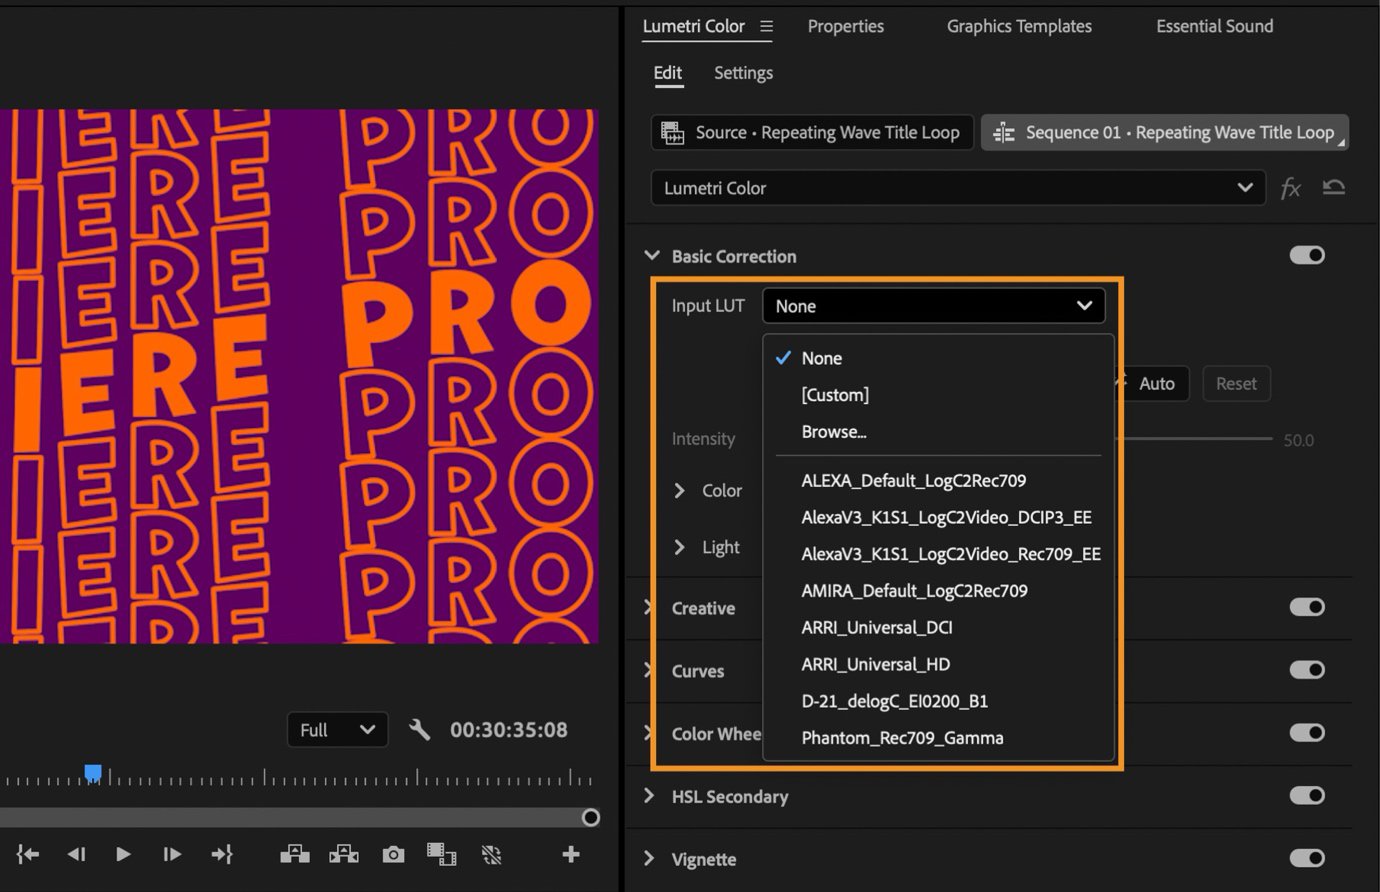
Premiere comes bundled with several libraries of LUTs created by Arri, Sony, Canon, Panasonic, Red and a few other companies. Accessing these LUTs is relatively easy. First, select the clip you want to apply the LUT to in your timeline. Then, locate the Lumetri Color Panel (either by clicking on Window -> Lumetri Color or by accessing the Color workspace). Expand the Basic Corrections section of the Lumetri Color Panel and click on the Input LUT dropdown menu. All of your installed LUTs will populate here.
For example, if you are shooting with a Sony Alpha series camera using S-Log3, choose the S-Log3 to Rec. 709 option. Similarly, if you shoot with an ARRI Alexa using LogC, you would choose the ARRI entry for ARRI LogC. When you apply the correct technical LUT, your footage should instantly transform into a balanced and neutral-looking image. Now you can continue to adjust your exposure, contrast and white balance normally. If you wish to add a creative look to your footage as well, scroll down to the Creative section of the Lumetri Color Panel and open up the Look dropdown menu. In addition to seeing a before/after slider at the top of that section, you will see an Intensity slider below it to reduce the overall effect of the chosen look.
As previously stated, some alternatives exist for grading-intensive projects such as DaVinci Resolve and Final Cut Pro's color toolsets. However, many editors run hybrid workflows where they do all of their color grading in Resolve and finalize their projects in Premiere, although that often represents additional complexity than most independent creators require.
How to Install Your Own Custom LUTs
There seems to be confusion among users regarding installing custom LUTs within Premiere Pro. There are two ways to install third-party LUTs in Premiere Pro: either manually pointing it at the directory containing your .cube files or installing them into one of Premiere's predefined directories. Either method works.
Manually Pointing To Your Directory
Select the clip in your timeline you want to apply a third party LUT to, locate the Lumetri Color Panel and click on Window -> Lumetri Color or enter the Color Workspace. Locate the Input LUT or Look dropdown and scroll to the bottom. Click Browse and navigate to your .cube file. Once loaded, it will appear in both the Input LUT or Look dropdown menus for that particular clip. The manual browse method allows for very rapid testing of new LUTs, but since each clip's LUT is tied solely to that individual clip, this method does not allow for universal access across multiple projects.
Installing Your Custom LUTs Into One Of Premiere's Predefined Directories
When Premiere launches, it scans two predetermined locations for .cube files. Simply copy your .cube files into either of these locations and they will be accessible via both Input LUT and Look dropdown menus upon subsequent launching of Premiere.
On Windows, the Input LUT directory is located at C:\Program Files\Adobe\Adobe Premiere Pro [version]\Lumetri\LUTs\Technical and the Creative Look directory is located at ...\Lumetri\LUTs\Creative. On Macintosh systems, these paths are located at /Applications/Adobe Premiere Pro [version]/Contents/Lumetri/LUTs/Technical (Creative for looks).
You may need administrator rights to write into these folders. Upon completing this process and restarting Premiere, your newly added LUTs will now appear in their respective dropdown menus. Note that whether you put an Input LUT in the Creative or Technical folder makes little difference, a technical LUT placed in a Creative folder will still work, but it will appear in the wrong dropdown menu.
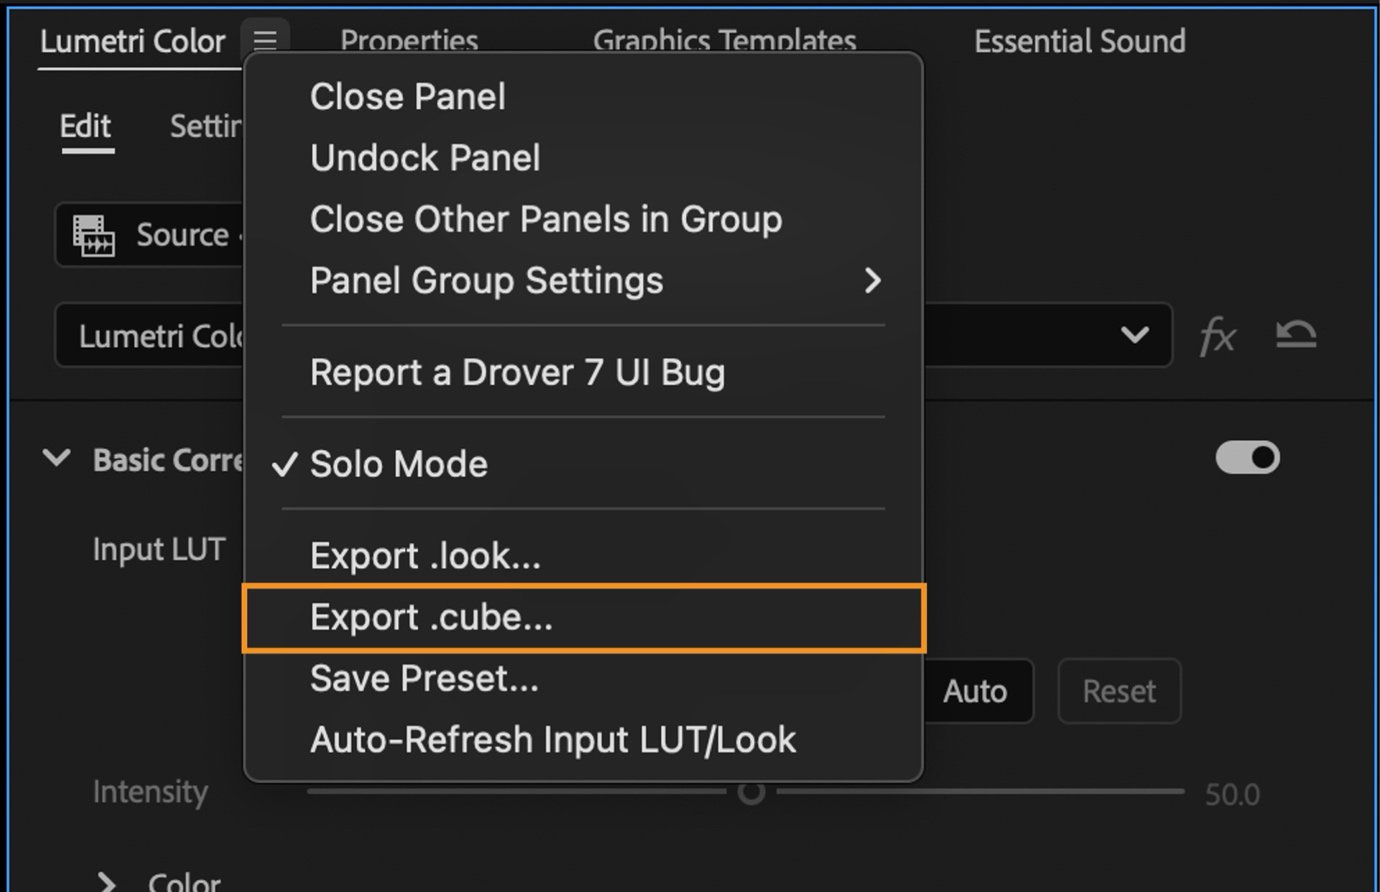
Keep your two types of LUTs organized separately starting day one for easier navigation. The Lumetri Color panel menu also lets you export your current grade as a .cube file for use on other projects.
For gear that actually gets used in a real color suite, a calibration probe on Amazon is the single biggest upgrade most colorists make after their monitor.
Changing The Strength of Applied LUTs
Most editors will tell you that an applied 100% LUT is rarely desirable, particularly when it comes to creative LUTs. Fortunately, Premiere provides an Intensity Slider beneath the Look Dropdown Menu for controlling how strong an applied creative look appears. If you pull this slider back to around 60 or 70 percent, most graded images will look much more natural and less "baked." The Input Slot does not provide an adjustable intensity slider because an Input LUT should be applied at either 100% or nothing at all. A technical LUT is meant to either perfectly match your log profile or fail to match it.
If you need to partially apply an Input LUT (a trick some editors use when creating a stylized baseline), apply it as a Creative Look instead, or duplicate the clip and then blend them together using Opacity. While neither solution is ideal, they both produce similar results as compared to being able to adjust an applied Input LUT's strength.
Another advantage of using Resolve for more complex grading tasks lies in its ability to treat Input LUTs similarly to creative effects as part of its node based architecture.
Troubleshooting Problems Users Encounter
The Grade Looks Crushed or Muddy
99 times out of 100, users who experience this problem have incorrectly applied a technical LUT to their footage. Using an S-Log3 LUT on S-Log2 footage produces incorrect results. Applying a Rec. 709-to-Rec. 709 creative LUT on unnormalized log footage produces incorrect results as well. Review your camera's picture profile and ensure that your camera matching LUT matches that picture profile precisely.
My Installed LUTs Don't Appear After Installation
Premiere only reads from designated LUT directories during startup. If you were installing LUTs while Premiere was active, stop all processes (do not simply exit the project) and restart Premiere. If they still do not appear after restarting Premiere, ensure that you installed them in the proper directory and that they are formatted as .cube or .3dl files. Premiere will not recognize other formats.
My Grades Are Off Between Premiere And DaVinci
LUTs are simply mathematics. Therefore, theoretically speaking, they should look identical regardless of application platform. However, due to differing color management configurations between platforms, actual appearance can vary significantly depending on how each platform interprets the original footage in terms of color space. Ensure that both programs interpret your footage identically in terms of color space.
Grade Performance Tanks After Adding LUTs
While LUTs themselves consume virtually zero processing power, combining heavy LUT adjustments with other Lumetri adjustments on high resolution footage can cause significant slowdowns in playback performance on older computers. Utilize proxy video or render preview frames for smooth editing performance on slower equipment.
Solid editing hardware also helps improve performance issues but typically rendering preview frames solves such issues without requiring new hardware. External SSDs for media storage and cache also help speed up workflow.
Using Log Footage Specifically
Log profiles record more dynamic range than traditional film stock, but log footage often appears flat or washed-out straight from the camera. Every professional digital cinema camera manufacturer offers their own unique version of log footage. Premiere offers matching LUTs for many of these popular versions including Arri's Log-C and Sony's S-Log3. Blackmagic shooters should refer to the Blackmagic Pocket Cinema Camera LUT guide for details on their film-to-Rec. 709 workflow.
In general, the most efficient workflow for most users is straightforward. First, apply the matching technical LUT. Next, adjust your exposure and white balance in Basic Corrections. Then apply a creative LUT in the Look dropdown menu at lower intensity. Finally finish with Curves or Color Wheels. Skip any one of these steps and you've made unnecessary work for yourself. For those interested in learning advanced techniques on how to optimize workflow utilizing LUTs and solid color grading practices, see our color grading masterclass.
Frequently Asked Questions
Can I use free LUTs in Premiere Pro?
Yes. Free .cube files from creators, camera manufacturers, and stock sites work exactly like paid ones. Sony, Canon, and Blackmagic all publish free technical LUTs for their log profiles, and sites like Lutify, Ground Control, and Motion Array offer free creative packs. A monitor calibration probe at B&H is what actually makes sure your grades translate across displays.
What's the difference between a .cube and .3dl LUT?
Both are 3D LUT formats. .cube is the more common one, used by Adobe, DaVinci, and most modern tools. .3dl is an older format from Autodesk that still works in Premiere. If you're downloading LUTs, .cube is almost always what you want. Premiere reads both the same way.
Can I use a LUT as an adjustment layer?
Yes, and a lot of pros prefer it. Drop an adjustment layer above your clips on the timeline, apply the Lumetri Color effect to the layer, then load your LUT in the Input or Look dropdown. Every clip under that layer gets the LUT. This is the cleanest way to apply a grade to a full scene.
Why do my LUTs look different in Premiere vs DaVinci?
LUTs are just math, so they should look identical, but color management settings differ between apps. Make sure both programs are interpreting your footage in the same color space. Premiere's Lumetri Scopes and DaVinci's scopes should show matching values if the pipeline is clean.
Do I need a separate LUT for every clip?
If all your clips came from the same camera in the same picture profile, one technical LUT covers everything. Drop it on an adjustment layer and you're done. Mixed cameras or profiles need separate technical LUTs per source, but you can still unify them with one creative LUT on top.
Where should I install LUTs for permanent access?
Drop them in Premiere's Lumetri LUTs folder, Technical for input LUTs and Creative for looks. On Windows that's under Program Files > Adobe > Premiere Pro > Lumetri > LUTs. On Mac it's inside the Premiere Pro application bundle under Contents > Lumetri > LUTs. Relaunch Premiere after copying and they'll show up in the dropdowns.